

5 tips on preparing files for print
- October 10, 2016
- Author: Amy Mangels
- Category: Design
In my last blog post, I talked about the differences between digital and offset printing. But before you can send any files to print, here are a few tips to carefully prepare your files for the best possible outcome.
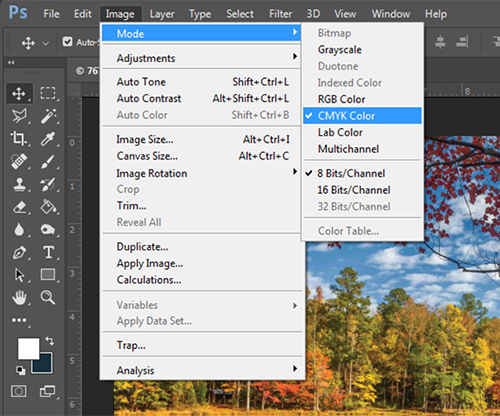
To change the color mode using Adobe Photoshop go to: Image > Mode > CMYK
Use color elements that are CMYK
The basic rule of thumb is that everything designed for the web should be RGB (Red, Green, Blue), and everything for print should be CMYK (Cyan, Magenta, Yellow and Key (black)). Any stock images you download or images you upload from your camera are going to be RGB by default. With the help of an image editor, like Adobe Photoshop or GIMP, you can easily change the color mode to CMYK.
Use CMYK for other elements in the document, including fonts, background colors, gradients and graphics.

Images shown at 200%. Image on the left is 72 dpi, image on the right is 300 dpi.
Use images that are 300 dpi
Images from the web are typically 72 dpi or 96 dpi (dots per inch). Images used for print are recommended to be 300 dpi. Images with a higher DPI have finer detail and will look clean and crisp in your final document. This is why designers use high-quality pictures and logos when designing your pieces, and do not pull them from the web.

Adding a 1/8” bleed to your final size (trim size) will create the bleed effect after the piece is printed and trimmed. The image on the left is what a successful use of crop marks looks like when activated in your document setting options.
Use bleeds and crop marks
Bleed is the term for the color, image or graphic that goes all the way to the edge of the paper. The element “bleeds” off the page with no border. To successfully create a bleed, you need to set up your document with at least 1/8 of an inch extra on all sides so that the document can be printed on a larger sheet of paper and trimmed down.
When exporting the final document for print, you will need to add crop marks and turn on your bleed settings so the vendor knows where the document needs to be trimmed.
Understand color differences
Monitors, TVs, phones and tablets use a RGB color mode and can support a wider spectrum of colors. CMYK color mode can reproduce most of the RGB colors, but not all of them. Depending on the equipment used, CMYK can match 85%-90% of colors in the RGB model.
The paper you choose can also affect the color outcome.
Exporting a file to a PDF print driver using Adobe InDesign
Use a PDF to submit your document
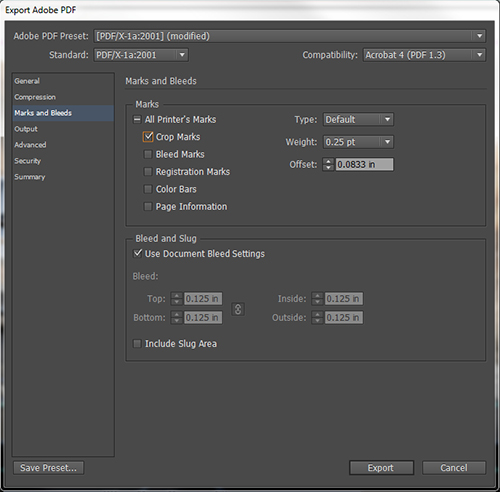
The most common and preferred method for submitting documents to print is by PDF (portable document format). By installing a PDF print driver on your computer, you can generate a PDF file suitable for printing. When choosing a PDF preset, I always use Adobe’s PDF/X-1a:2001 option. It converts all RGB images to CMYK (in case you’ve missed one), embeds all fonts, and preserves your CMYK values.
During this process, you can add crop and bleed marks, page information, and registration marks, if needed.
Another option is to send your native design files to the print shop. When using this option, make sure you’ve packaged all fonts, images and graphics, so no files are missing when the document is opened on another computer. In Adobe InDesign, you can package your files by going to File > Package.
If you are unsure about the intricacies of preparing files for print, reach out to a professional designer to help you set up and export your documents correctly. This can prevent costly and time-consuming errors. Also, many design firms receive special printing discounts that can then be passed along to you.
Author’s note: In the tips above, I’ve mentioned Adobe Creative Cloud programs such as Photoshop, InDesign and Acrobat, as they are industry-standard and will produce the best outcomes. There are many other image editors and PDF drivers, but these programs offer the highest standards of flexibility and precision.